

New Player Guide

(H)ail, Adventurer!
Welcome to Aêthoril—a vast new land rife with opportunities, both familiar and unexpectedly surprising. (C)onsider this guide a friendly companion to help you take your first steps and make the most of your time in our world.


New Player Essentials
1. Chat and Other Players
Throughout your adventures, you'll spend much of your time chatting and interacting with other players. These exchanges take place in the chat window.
To type a message, press Enter to open the message bar, then Enter again to send.
By default, new messages are written in say, which broadcast to players a short distance around you.
However, you may notice some general discussion taking place in out of character, also known as OOC.
OOC is an excellent place to ask questions about the world and controls, find like-minded adventurers to team up with, and even just pass the time. Conversations in OOC are broadcast to everyone in the zone, rather than within a specific proximity.
To type a message in OOC, prefix your message with /ooc.
2. Inventory and Items
As the first step of your adventure, you’ll want to get your belongings in order. Press I to access your inventory.
The left side of your inventory provides a summarized view of your character’s persona, statistics, and resistances. On the right side, you’ll find your character’s equipment, inventory, and bags.
You can carry one backpack, three bags, and three belt items (pouches or other trinkets). Each bag you acquire must be equipped in the appropriate slot to be accessible, and can store items of varying types and sizes, depending on the bag.
To inspect a piece of equipment, item, or bag in your inventory, hover your cursor over it and hold right-click. After a brief pause, the inspection window will appear.
You can activate your Trainee’s Candle with a single right-click, and deactivate it the same way.
Your candle provides a useful light source at night or in dark spaces. Be sure to deactivate it during the day, or you may find yourself without it when you need it most.
3. Spells and Abilities
In your inventory, you’ll also have ability scrolls. These scrolls teach you how to perform powerful spells and abilities. To learn a scroll, you’ll first need to scribe it into your spellbook, which, for casters, must be equipped in a belt slot.
Left-click a scroll to place it on your cursor. Next, open your spellbook by pressing B. Inside the book, you’ll find tabs for Skills, Innates (abilities), and “Book” (spells). Select the appropriate tab for your scroll type. Then, with the scroll still on your cursor, click one of the empty squares to begin scribing. Alternatively, right-click a scroll to “quick-scribe” it into your current spellbook.
Once the scribing process is complete, the ability will be added to your spellbook; however, you still can’t quite use it yet.
To use an ability, you have to memorize it first. You can only have ten memorized abilities at once, but can swap them at almost any time.
To memorize an ability, while in your spellbook, left-click on the ability icon to place it on your cursor. Then, move your cursor over to your ability bar and click on one of the ten empty slots to memorize it.
When finished, press the number key that corresponds with the slot on the ability bar to use it (e.g. Press 1 to use Ability 1). If you have no target selected, you’ll use the ability on yourself, even if it has a negative effect.
4. Combat and Skills
With your newfound abilities scribed and memorized, it’s time you engage in your first bout of combat. Explore your surroundings using the movement keys W, A, S, and D, which correspond to forward, left, backward, and right respectively.
Press Tab to target and cycle through nearby enemies. With a prospective target selected, press C to consider it. In your chat window, you’ll see your target’s relative disposition toward you, as well as a rough estimate of the battle’s outcome.

Approach the target and press Q to activate your auto-attack. As you fight, your skills in combat will improve, allowing you to take on more difficult opponents. You can view the current levels of all your skills by pressing P.

Once you vanquish your foe, it’s time to reap your reward. Right-click your target’s corpse to loot its belongings. Experience is the most valuable reward from battle. As you accumulate it, you'll level up and increase your overall power. Your progress toward the next level is tracked in your inventory (I).
5. Non-Player Interactions
Returning to your inventory (I), you should have a note in your first inventory slot. Right-click the note to read it.
This note serves as an introduction to your class guild. Class guilds help you get started by offering an introductory quest chain, skills training, and new ability scrolls.
The note suggests you seek out your guild master. To learn where they might be, you can ask your fellow players in OOC, or try asking a guard. Guards and most other NPCs respond to conversation like a fellow player would; however, you must choose your words wisely to earn a reply.

To initiate a conversation, target the NPC and press H to “hail” them.
Conversations with NPCs appear in the interactions window to isolate them from player chatter and combat messages. After the guard responds to your hail, you can ask them for directions to certain NPCs and locations by typing your question in say.
Guards will respond with additional keywords to continue the conversation, or offer rough directions for you to follow. They can also provide tips to help you find your way.

Beyond asking guards, you can also check your surroundings for clues using the Look button. Signage throughout the city also provides reassurance that you’re on the correct path.

Once you’ve located your guild master, offer them the note you started with.
To do so, open your inventory (I) and left-click the note to place it on your cursor. Then, move your cursor to the NPC and left-click them to hand in the note.
The NPC responds, welcoming you to the guild and rewarding you for your efforts.
If you find yourself uncertain what to do next, try asking the quest giver related questions. You’ll often find clues or keywords in their statements, and you can revisit the conversation in your Journal (J).

6. What's Next?
Now that you know the essentials, check out our Game Manual for a more detailed breakdown of the controls, features, and actions that will prepare you for your adventures across Aêthoril.
Game Manual
Table of Contents
Basic Controls
The following controls are default values. Most of these can be changed within the game by pressing ESC to open the Options menu, then clicking Keybinds.
Keyboard Controls
WASD moves your character (forward, left, back, right)
SPACEBAR makes your character jump
X makes your character sit
Z makes your character crouch
F assists the current target, switching your target to theirs
/ on the keypad toggles run/walk
E toggles auto-run
Q toggles auto-attack
H hails the targeted NPC, triggering any initial dialogue they may have
C considers the targeted NPC, assessing their relative level and disposition towards you
T starts a “tell,” or private message
R starts a reply to the last received tell
SHIFT + T starts a tell to the last recipient of a tell
G starts a group message
I opens your inventory
SHIFT + B opens your bags
B opens your spellbook, which includes abilities, skills, and spells
P opens your skills list
O opens the Social window
J opens your journal, which displays a list of prior NPC conversations
U interacts with an object or entity (similar to right-click)
Y inspects a target player
SHIFT + G opens the Guild window
TAB targets the closest visible NPC; repeat presses cycle through visible NPCs
SHIFT + TAB targets the closest visible player; repeat presses cycle through visible players
CTRL + TAB targets the previous/last target
F1-F6 targets yourself and your party members, in that order
F7 targets the nearest friendly target
F8 targets the nearest hostile target
F10 toggles your user interface off and on (great for screenshots!)
F11 toggles game statistics (network meter and FPS indicator)
F12 takes a screenshot
ALT + O opens the Options menu
ALT + ENTER swaps between windowed fullscreen and windowed modes
CTRL + S toggles sound effects
CTRL + M toggles music (but you’ll never use this)
ESC closes temporary windows (e.g. a merchant), or if all temporary windows are closed, opens the Options menu
1-0 triggers abilities on your ability bar
SHIFT + 1-0, -, = triggers buttons placed on your hotbar
CTRL + 1-0 triggers abilities on your aura bar
PAGE UP/DOWN scrolls up and down on the current chat window
SHIFT + PAGE DOWN scrolls to the bottom of the current chat window
Mouse Controls
LMB (Left mouse button/left-click) an object or NPC to target it
RMB (Right mouse button/right-click) an object to interact with it
Hold LMB to rotate the camera
Hold RMB to rotate your character
Hold RMB + A/D to strafe (you can also remap strafe to A and D if you prefer)
Hold RMB over an item or spell to see its details
Hold ALT+ LMB on an item to open the item’s description
RMB a UI element to display customization options
MMB (Middle mouse button/mouse wheel click) the title or border of a UI element to display/hide it, or change its appearance
The Interface
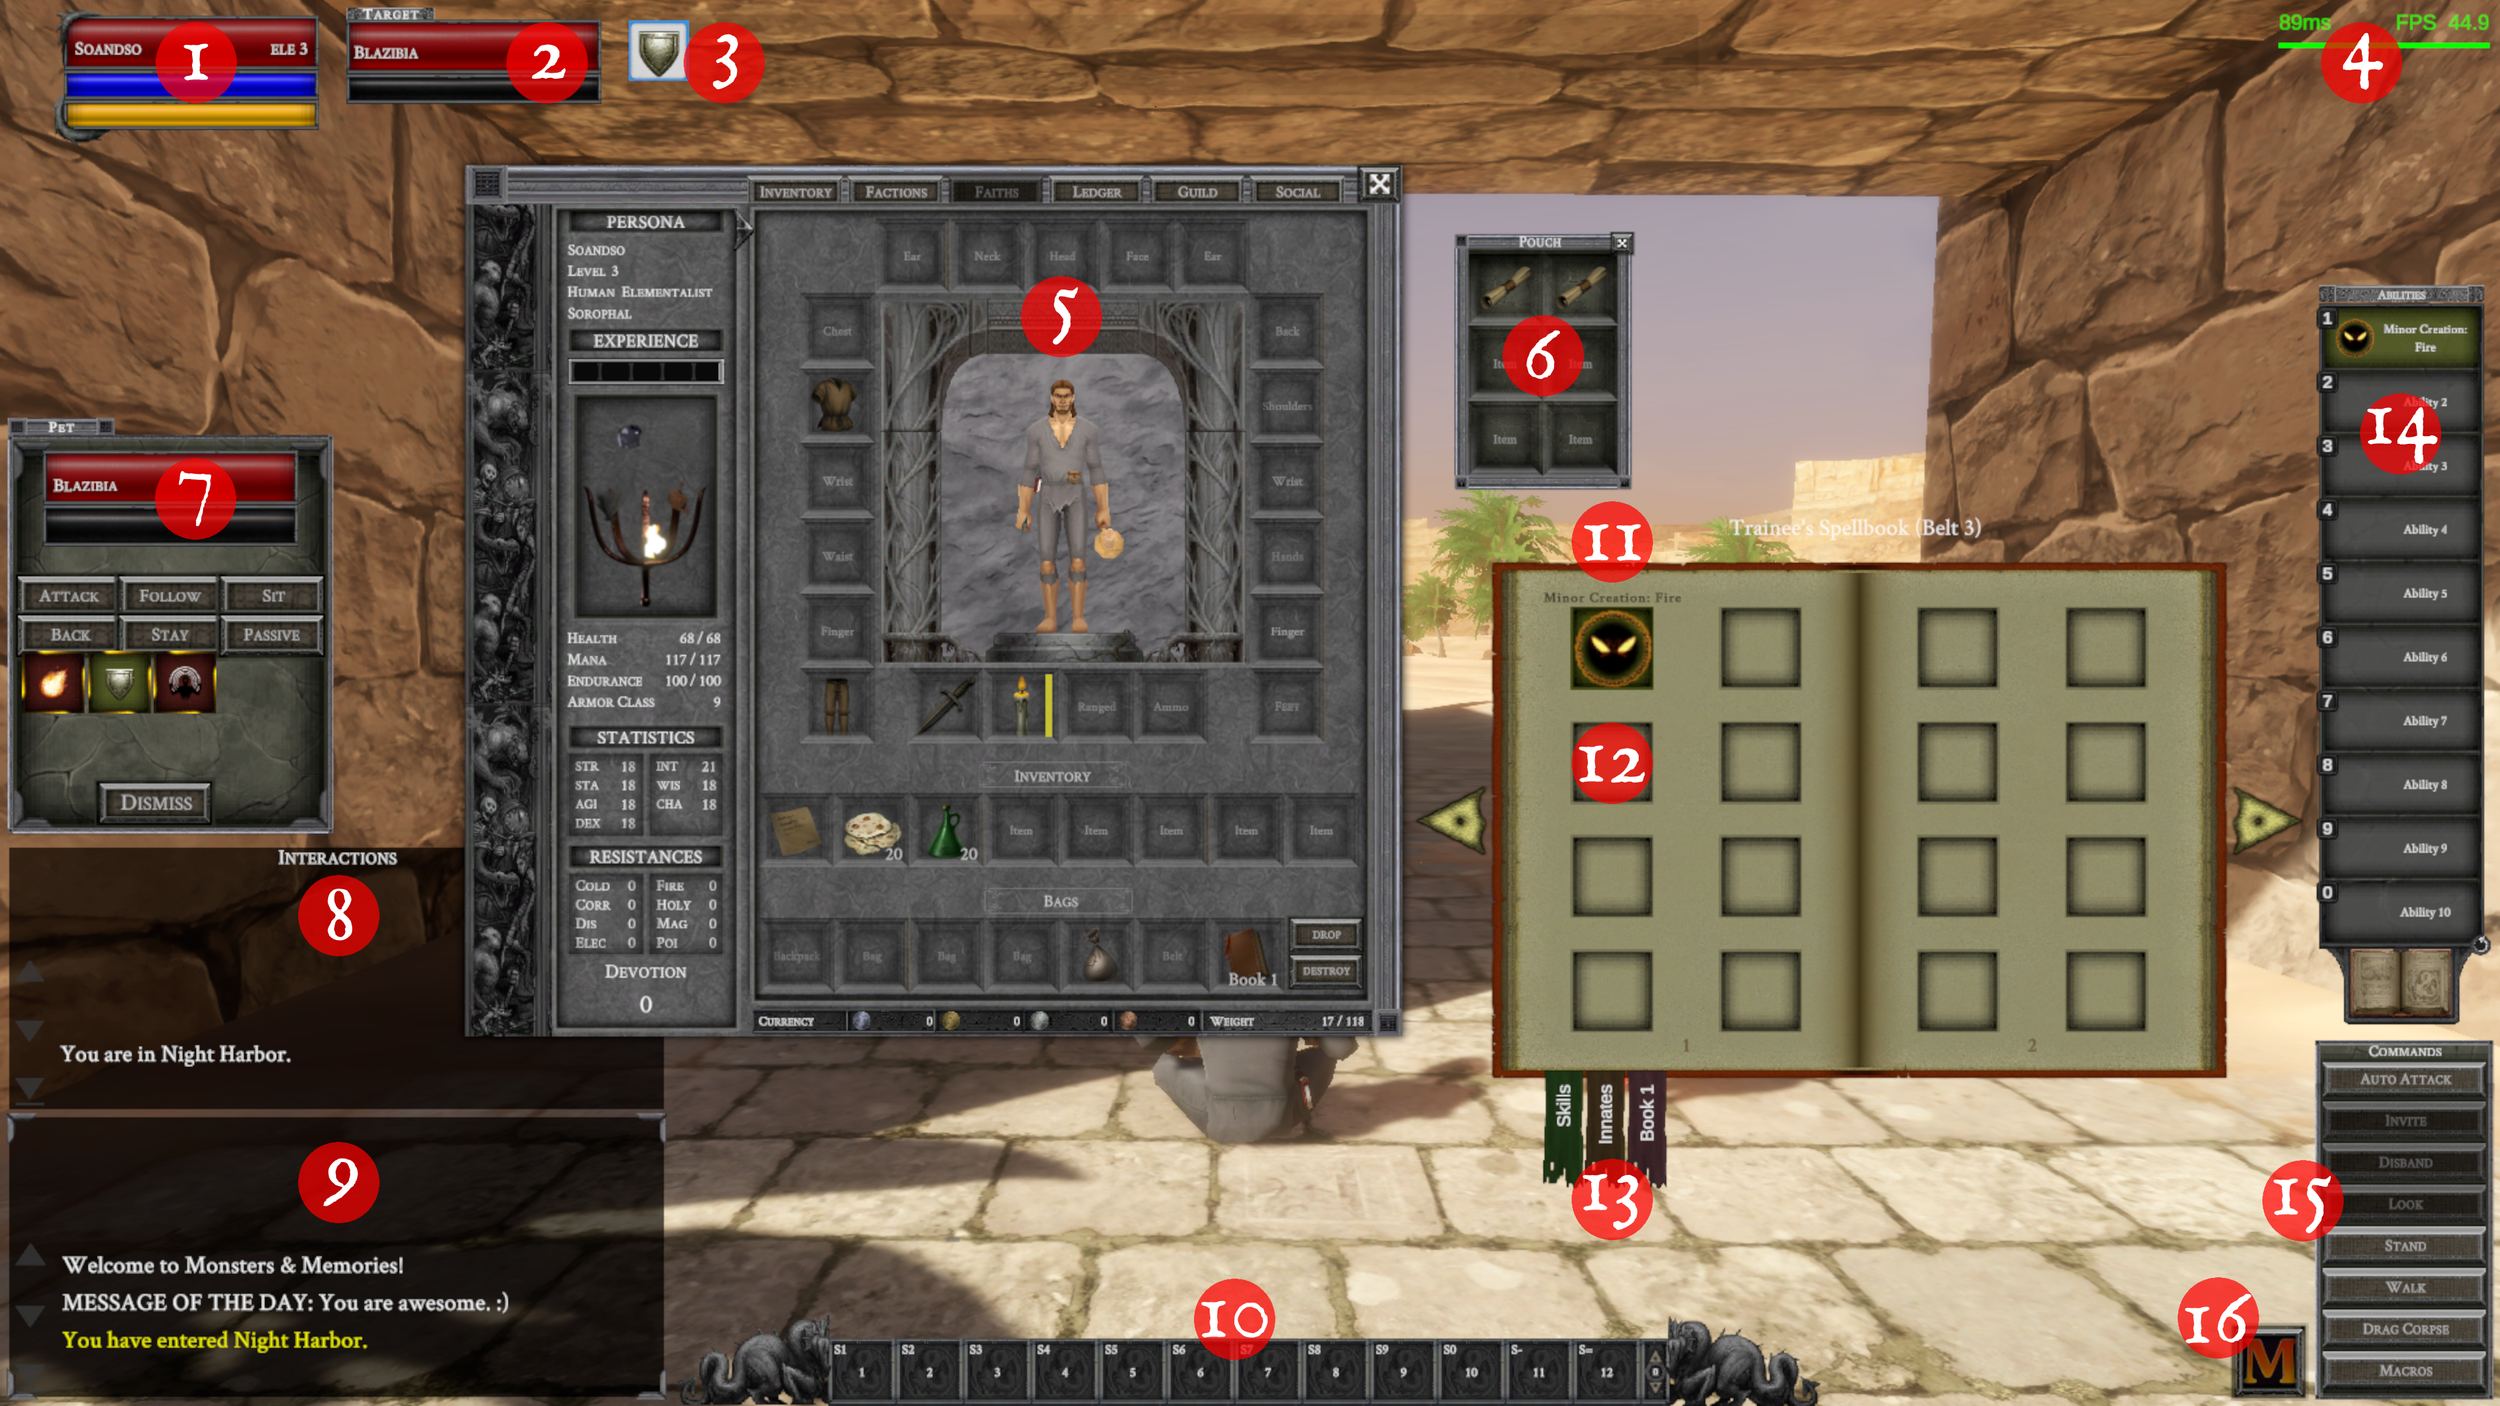
You can scale and lock windows by right clicking on a window and selecting the appropriate option from the context menu. Feel free to experiment with the UI’s layout and filtering, as you can always reset it via Options | Reset UI.
Player’s health, mana, and endurance
Target’s health and mana
Player’s buffs and debuffs (i.e. beneficial and detrimental game effects)
Network meter and FPS indicator (F11)
Inventory window, stats, equipment, and experience bar (I)
➥ Your statistics, resistances, weight, and experience can persist on screen at all times by separating them into an additional window. You can enable this feature under Options | Interface | Always Show Pop Out Stats.
Loot window/inventory bag (SHIFT + B)
Pet window with health, mana, buffs, debuffs, and commands
Interactions box (with MUD action selector)
Chat box
➥ You create new chat boxes by right-clicking the existing one and selecting Open New Window. You can also filter your chat boxes using this right-click context menu.
Hotbar (for macros, items, skills, etc.)
Spellbook (B)
Empty slot (pick up an ability/spell scroll from your inventory and click here to scribe it)
Tabs to select between:
• Skills (e.g. Fishing)
• Abilities (e.g. Kick)
• Spells (and spellbooks)
Ability bar
Additional commands
• Enable auto-attack
• Invite people to a group, accept an invitation, and disband from a group
➥ The group/groupmates window is not shown; it’ll show under (1).
• The MUD action /look command
• Toggles for standing/sitting and walking/running
• The /corpse command (to drag your corpse)
• Macros button (opens the Macro Editor so you can make your own hotkeys using any slash ( / ) command listed under /help)
Options menu (ALT + O)
Interact with Players and NPCs
Much of our non-combat interaction takes place in the chat box. This includes talking to both players and NPCs (non-player characters), as well as interacting with the world via our MUD action system.
TIP: You can create new chat boxes and modify them via a variety of filtering options. Feel free to experiment with the UI’s layout and filtering, as you can always reset the UI via the Options menu.
Interaction Basics
To speak with an NPC, target them and press H to “hail” them
NPCs may respond to certain words, so if they say something of interest, try asking them about it in /say (they must be targeted)
Take care not to hit Q while speaking with an NPC
Right-click merchants or trainers to view their offerings
Trade items of interest (e.g. your starter note) to the correct NPCs to start or complete quests
Chat Basics
/say sends a local, limited radius public message
/tell <playername> or /t <playername> sends a private message to the specified player that spans the entire game world
➥ Type /r or press R to reply to the last “tell” you received from another player
/shout sends a zone-wide message to your current zone, typically used for more formal notifications
/ooc sends a zone-wide message to your current zone, typically used for informal “out of character” notifications
➥ Each server sets its own standards for the distinction between /shout and /ooc in terms of how much speaking in or out of character matters
/auction sends a zone-wide message for buying, selling, and trading goods and services
/g, /group, /p, or /party sends a message to your group that spans the entire game world
/gu sends a message to your guild that spans the entire game world
/of sends a message to guild officers that spans the entire game world
/filter on or /filter off enables or disables the chat profanity filter
/ignore <playername> blocks all messages from the specified player, and if appended with “account,” blocks messages from all of that player’s characters (e.g. /ignore <playername> account)
➥ Type /ignore list to see a list of all the players you’ve ignored
Ask for Directions

As a general rule, you can determine the cardinal directions in an outdoor zone based on the movement of the sun or moons, which rise in the east and set in the west. However, if you’re looking for more specific directions to a point of interest, we recommend asking a guard.
To ask a guard for directions, ensure you target them first, then type a “keyword” in /say. Here’s some examples of keywords you can use:
Cardinal directions (i.e. north, south, east, west)
General districts (e.g. Necropolis, Sageside)
Notable locations (e.g. Concourse of Souls, Night Market)
Points of interest (e.g. bank, inn, Western Gate)
Classes and class trainers (e.g. cleric, fighter, Fedamius Steele)
Merchants and buyers (e.g. armor, drink, food, meat, pelts)
Sell Your Wares
Our merchants can be a little more… discretionary with their purchases than most and won’t simply buy any old rock you pick up off the ground. Keep this in mind when you’re looking to sell your wares.
Most merchants only buy items that are similar to what they sell, so a butcher will buy meat, and a tailor will buy tailoring supplies. They’re also willing to pay a premium for these items, so it’s a good practice to seek them out if you want to turn a profit.
There are, however, some shady individuals who will buy just about anything. If you’re just looking to clean house, pay them a visit, but know that you might not get the best price.
If you’re looking to sell a particular type of item, try asking a guard (see Get Directions) or your fellow players!
TIP: Everything you and other players sell to a merchant becomes part of their inventory, so it never hurts to visit merchants regularly. You might find that someone else’s trash is your treasure!
Night and Darkness
Dangerous creatures skulk about Aêthoril at night… and when it’s dark, it’s dark. If you’re planning to roam outside the safety of your home city, you’re going to want to bring a light source.
All new adventurers start with a simple candle. Right-click it to light its flame, but be cautious, as the candle won’t burn forever! You should seek out a more reliable light source before you’re caught unawares.
Numerous merchants, including those of the shady variety, offer light sources for purchase. The cheapest option is a torch (which you can also craft yourself using the Survival tradeskill), but if you’ve gathered enough coin, a lantern is a worthwhile upgrade. The lantern can be affixed to your belt, so you don’t need to give up your offhand slot. When its light fades, you can simply replace the fuel to get it going again.
Beyond the torch, candle, and lantern, some races have the fortune of being able to select the Infravision trait. This will help you at night, though you’ll still likely want a light source.
If you’ve made your way to a camp with some companions, setting up a campfire is a great way to beat the darkness, mark your camping spot, and get an experience boost! See States to learn more.
Combat
As you’d expect from an MMORPG, much of your time will be spent slaying monsters (it’s even in the name!). You’ll have an arsenal of abilities at your disposal to do so, along with your standard auto-attack function.
To enable melee auto-attack, target an enemy and press Q
If you’re an Archer or Ranger and outside of melee range, this will enable ranged auto-attack
If you’re not an Archer or Ranger, to shoot with a bow or throw a dagger, you’ll need to use the Shoot or Throw ability
Abilities and Spells
New characters start with a few ability/spell scrolls in their inventory. To use an ability or spell, you need to “scribe” the corresponding scroll into your spellbook first.
Press I to open your inventory, then click on a scroll to place it on your cursor
Press B to open your spellbook, then move your cursor (with the scroll) to an empty space and click it to begin scribing
➥ Note that there are 2-3 tabs in your spellbook for different ability/spell types, i.e., spells, innates (abilities), and skills
➥ You must place your scrolls on the correct tab to be able to scribe them (try another tab if it fails to scribe)
➥ You can buy additional ability/spell scrolls from merchants near your class’s guild hall
TIP: You can also right-click scrolls to “quick-scribe” them into your currently equipped spellbook. If you have multiple spellbooks on hand, you’ll be prompted to select which one to scribe to, as scrolls can’t be restored once they’ve been scribed.
After scribing a scroll to your spellbook, add it to your ability bar to “memorize” it for use.
Click on the spellbook to place it on your cursor
Move your cursor to an empty space on the bar and click it to begin memorizing
➥ Once memorized, you can activate it using the corresponding number key (1-0)
TIP: Your spellbook must be equipped in a belt slot (not to be confused with the waist slot) to scribe or memorize spells, but it is not required to cast them. Since it's an equipped item, it will also drop upon death.
Death
When you inevitably die, your items stay on your corpse and you respawn at your “bind” point. By default, your bind point is set to the location where you first logged in to your character; however, this can be changed through spells and other mechanisms.
If possible, when you are about to die, make note of any features in the environment to help you find your corpse. You can also locate your corpse through the use of certain spells, and expedite its recovery through certain abilities.
Other players can also help you find your corpse, don’t be afraid to ask for help
Some classes have access to resurrection spells that can summon you to your corpse, with more powerful versions also returning some of the experience points lost
Players can drag your corpse to you if you give them your /consent
➥ Take care to only /consent people you trust, lest they hide your corpse
➥ Type /consent group to allow all players in your group to drag your corpse
➥ Type /deny <playername> or /deny group to rescind your consent
TIP: If you don’t recover a corpse, it will expire after a certain duration elapses. Corpses with no items on them expire after 30 minutes (L1-4) or 3 hours (L5+). Corpses with items expire after 2 hours (L1) or 7 days (L2+).
But if your corpse expires, fear not—it can still be recovered. Simply visit your city’s local Priest of the Matswar to have it summoned for you. A guard can point you toward them if you ask nicely.
Cantrips
Cantrips are a unique perk granted to the true caster classes: Clerics, Druids, Elementalists, Enchanters, Necromancers, Shamans, and Wizards. They allow these classes to assign one of their memorized spells as a cantrip so that it is retained upon death, even if you don't have your spellbook available.
The first cantrip is granted at level 4, with additional cantrips added at specific intervals as you level.
To determine if you have a cantrip available, check the number next to your memorized spells. They will appear orange.
➥ If none of your spells have an orange number, you don’t have any available cantrips.
➥ If the number for one spell does not turn orange, but others do, the spell is not eligible to be assigned as a cantrip.
To assign a cantrip, click the orange number next to it. You will re-memorize the spell.
The number next to an assigned cantrip appears blue.
Grouping Up
Grouping is a powerful tool in our game and you’ll benefit from it even at the lowest levels.
Experience points, coin, and access to your enemy’s corpse is shared within the group
You must be within 5 levels of the highest-level group member to gain experience until level 15; after that, you must be at least two thirds of their level (e.g. a level 40 can group with a level 60)
Type /lfg on to notify other players that you’re looking for a group in /who searches
The Group Finder

You can use the Group Finder to find groups that are recruiting, or if you’re a group leader, advertise your group to prospective members.
Access the Group Finder by pressing O to open the Social window, then clicking the Group Finder tab. Alternatively, open your inventory by pressing I, then clicking the Social tab and Group Finder.
Create a new group listing by clicking List Group while either solo or in an existing group.
Complete the group listing by defining the desired level range (generally within 5 levels of each other), classes, roles, and objectives (text field).
Click List Group when you’ve finished customizing the listing. Once listed, click Update Listing to modify or remove the listing.
Prospective members can view each listing’s summarized requirements from the main Group Finder window.
• The note icon next to the number of group members lets you know how many spaces are left in the group.
• Click the note icon to see an expanded view of the listing with desired classes (if any).
Click LFG List to show all players currently looking for a group.
If you’re interested in joining a listed group, select it, then click Send Tell to automatically message the group’s leader about your interest.
Quests and MUD Actions
Quests in Monsters & Memories have no indicators, so you’ll have to talk to NPCs and interact with the world in order to find them. Most quests start with a simple “Hail.”
Target an NPC and press H to hail them
Keep the NPC targeted and type your response in /say to trigger further dialogue
➥ NPCs only respond to specific words in their dialogue, so try including the words that stand out in your response
Press J to bring up your journal, which contains a history of prior NPC conversations
Hand quest items to an NPC by placing them on your cursor, then clicking on the NPC
➥ NPCs give back items they don’t want
Quest item descriptions often provide clues regarding their use; if not, try asking the quest-giver
Quest bags are typically designed to hold 1 item per slot (if you forget the quest requirements)
➥ Most quest bags require you to hit the Combine button at the bottom once full
You can also interact with the world via a system we call MUD actions—a nod to text-based multi-user dungeons. This system allows you to look for descriptions of the area you're in, inspect things you find, take or place objects, and even pry something open (if you have the right item on hand).
MUD actions share a global cooldown, so keep that in mind when attempting to use them back-to-back. Some actions may require you to be in possession of a specific item or items, but the description should make that clear.
Here’s a list of all the verbs for you to try:
/break <thing>
/insert <thing> (while holding an item on your cursor)
/inspect <thing>
/look
/open <thing>
/place <thing> (while holding an item on your cursor)
/pour <thing> (while holding an item on your cursor)
/pry <thing> (while holding a prying implement on your cursor)
/pull <thing>
/push <thing>
/rub <thing>
/smell <thing>
/take <thing>
/taste <thing>
/throw <thing> (while holding an item on your cursor)
The system is similar to our quests in that some of the prompts, items involved, specific utilization of said items, etc., may be unclear, unwieldy, or otherwise require some experimentation. Our goal is to use this type of system to create interesting, fairly unique, and definitely retro-style interactions that keep the world feeling mysterious and interactive at a low implementation cost.
Helpful Commands
Enter any of the following commands in your chat box to activate them.
/help lists all commands available to you and accepts an optional search term to narrow the list (e.g. /help corpse)
/bug or /petition opens a form to report a bug or request assistance
/rewind, /stuck, or /unstuck returns your character to the last unstuck position (5m cooldown)
/camp forces your character to sit for 30 seconds and then camp (out of the game)
/lfg on <message> lets other players know you’re looking for a group in /who searches, with an optional message appended
/chatfontsize <size between 1-20> increases/decreases the chat font size
/random <dice count + dice size> or <value - value> (e.g. 3d6 or 1-18) rolls a dice with randomized results
/note brings up a window that serves as a notepad
/hidecorpse <option> hides corpses in the current zone, modified by replacing <option> with one of the following:
• all hides all corpses except your own
• npc hides all non-player corpses
• pc hides all player corpses except your own (recommended)
• group hides the corpses of players in your group
• nongroup hides all player corpses except those in your group
• allbutgroup hides all corpses except those in your group
• looted hides all corpses that have been looted (default)
TIP: Additional video optimization, mouse/input, and other options will be added as we go. Also, if you find yourself stuck during a play test and all of your options are on cooldown, feel free to submit a /petition and we’ll help you out as soon as possible.
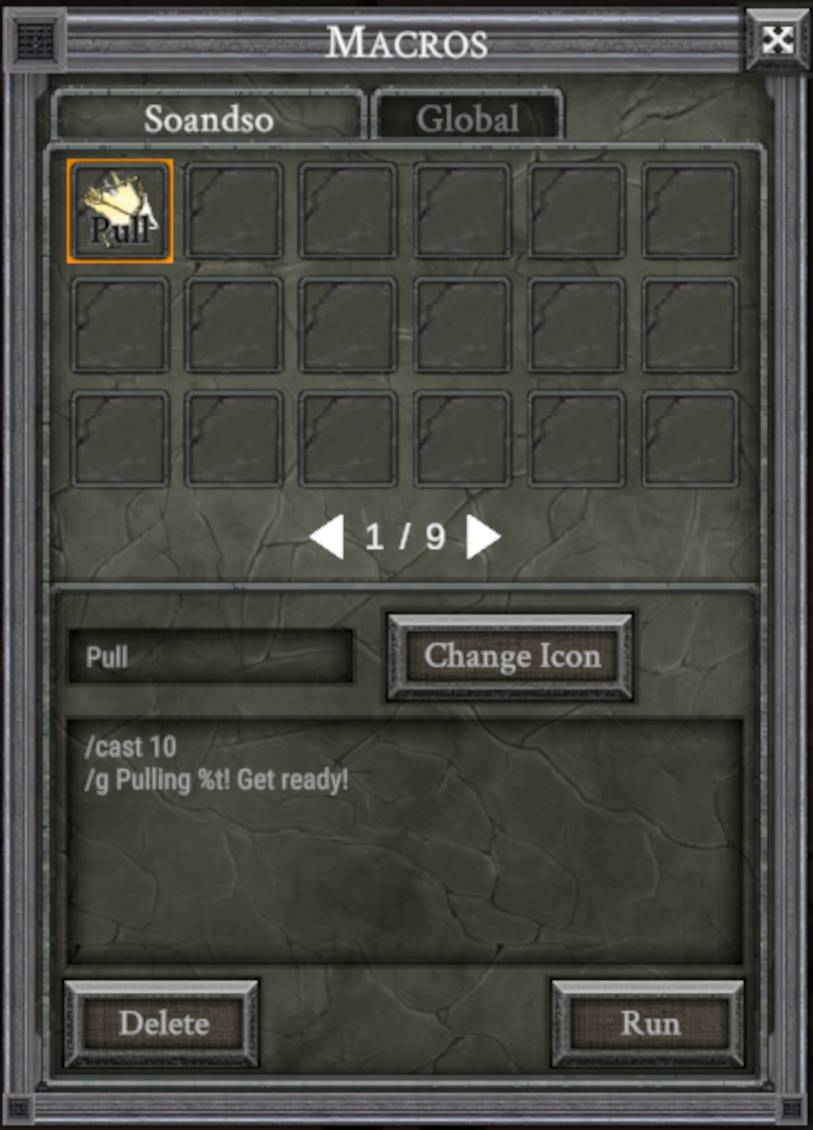
Create Macros
Macros let you create custom hotbar buttons for any slash ( / ) command. They serve as useful shortcuts for frequently used commands, and can be set up to trigger multiple commands at once.
TIP: To view a list of all commands that can be used in a macro, type /help. Additionally, “Chat”-type commands (e.g. /say, /g) support the use of %t to populate the target’s name, and %me to populate your own name.
To create a macro:
Type /macro or click Macros from the Commands list.
If you want to create a macro for the specific character, click the tab with your character’s name, otherwise, click Global to create an account-wide macro.
Click an empty square to begin creating a macro.
Complete the options as follows:
• Name: Enter a name to display on your macro button.
• Change Icon: Select an icon from the list to display on your macro button. Click Okay once selected.
• Macro: Enter the commands to run when activating your macro button. Additional commands beyond the first should be written on the next available line.
You can now add your macro to the hotbar. Hold left-click on your macro’s icon to place it on your cursor, then click on a hotbar space to add it.
States
States represent the current condition of your character and affect your character in various ways.
The Hungry and Thirsty states occur when your character is out of food or drink. In these states, your health and mana recovery rates are drastically reduced.
The Encumbered state occurs when you’re carrying more weight than you can handle. In this state, your movement speed is reduced and you cannot gate or teleport.
The Rested state occurs when you’re near a campfire or inside an inn. In this state, you accumulate rest, which grants a 15% bonus to experience gained. Rest does not accumulate if you’re exposed to rain or other adverse weather effects.
The Tired state occurs when you run out of accumulated rest. Despite its name, this state has no negative impact beyond the fact that you no longer benefit from the experience bonus.
The Sheltered state occurs when you’re inside or under some form of shelter. In this state, you can continue to accumulate rest from a campfire or inn even during poor weather.
The state you’re most likely to maintain on a regular basis is the aforementioned Rested state, which grants a 15% experience bonus when spending time near a campfire (Warmth of the Campfire) or inside an inn (Warmth of the Hearth).
If you’re out in the field, you can place your own campfire using the Survival skill while possessing eight pieces of wood. Wood can be harvested with a Lumberjack Axe from the numerous nodes found near trees. If your campfire’s flames begin to die out, you can rekindle it by “trading” it a piece of wood.
Warmth of the Campfire
Accumulates up to 20 minutes of rest within the radius of a campfire (unless it's raining, then you must be under shelter)
If you accumulate the full duration of rest (takes roughly 2 minutes), you’ll receive a message stating that you’re “fully rested”
If you leave the radius early, you’ll only receive a partial duration (e.g. 1 minute = 10 minutes of rest)
Warmth of the Hearth
Accumulates up to 20 minutes of rest within the radius of an inn
If you accumulate the full duration of rest (takes roughly 2 minutes), you’ll receive a message stating that you’re “fully rested”
If you leave the radius early, you’ll only receive a partial duration (e.g. 1 minute = 10 minutes of rest)
While under the effect, you no longer consume food or drink
Common Acronyms and Terms
Throughout your adventures, you’ll come across a variety of acronyms and terms, many of which might be unfamiliar. But don’t fret! We’ve provided definitions for some of these terms below. Take a look!
Aggro - Drawing the attention of a hostile NPC
AOE - Area of effect; spells or abilities that hit multiple targets
Bind - A spell that sets the location where you will appear after death (or the “Gate” spell)
Box/Boxer/Boxing - A player controlling multiple accounts at the same time across different game clients (or computers).
Buff - A spell or ability that positively affects player and/or NPCs
Camp - A location where players gather and “pull” enemies while leveling; or, the act of logging out of the game
CC - Crowd control; the act of delaying a hostile NPC’s attack through various abilities or tactics; or camp check; a term used to identify which areas in a zone are currently “camped” by individuals or groups
Charm - A spell that enthralls a player or NPC and compels them to follow the caster’s commands
Con - Consider; a command that determines how favorable an NPC views you and an approximation of their strength compared to yours (typically indicated by a color)
Corpse - The dead body of a player or NPC
Corpse Run/CR - The act of returning to a place of death to retrieve a “corpse”
Crack - Any spell or ability that increases the target’s mana regeneration
DD - Direct damage (as opposed to “DoT”)
Ding - Leveling up
Debuff - A spell or ability that negatively affects player and/or NPCs
DoT - Damage over time (as opposed to “DD”)
EXP/XP - Experience points
Gate - A spell that teleports the caster to their “Bind” location
GM - Game Master; an in-game customer service representative
Fizzle - Fail to cast a spell
FM - Full mana
HP - Hit points or health points
Inc - Incoming; typically used when “pulling”
Kite - The act of fighting or “CCing” one or more NPCs by remaining out of their attack range
KOS - Kill on sight; an NPC that will attempt to kill you if you get too close
KS - Kill steal; the act of stealing credit for defeating an NPC
LD - Link dead; to lose connection to the game
LFG - Looking for group
LFM - Looking for more
LOS - Line of sight; being able to see or be seen by a target
Lull/Pacify/Placate - Any spell or ability that reduces an NPC’s aggro radius
Mana - The pool of magic points used to cast spells
Mez - Mesmerize; any spell or ability that incapacitates a target for a period of time
Mob - Mobile; a monster or NPC
MP - Mana points or magic points
Named - An NPC with valuable items, often uniquely named and more powerful than normal
Nerf - The reduction in strength of a player, NPC, item, or ability
Newb/Newbie/Noob - A new and/or inexperienced player, with “noob” often carrying a derogatory connotation
No-Box - A play style or server rule set that does not permit “boxing”
No Drop - An item that cannot be dropped on the ground or traded
No Rent - A temporary item that will disappear after logging out of the game
NPC - Non-player character
Nuke - A powerful direct damage spell or ability
OOC - Out of character (as opposed to roleplay); or, a zone-wide chat channel for casual conversation
OOM - Out of mana
PC - Player character
PH - Placeholder; typically used to reference an NPC that, if killed, has a chance to reappear as a “named”
Pop - Indicates that an NPC has appeared
Proc - An ability that activates randomly
Pull - The act of “aggroing” an NPC and returning it to a “camp”
PVP - Player versus player
Res/Rez - Resurrect; any spell or ability that brings a “corpse” back to life and replenishes some of the lost experience
Root - Any spell or ability that prevents a target from moving
RP - Roleplay, in character (as opposed to out of character)
Snare - Any spell or ability that slows a target’s movement speed
SoW - Speed of the Wild; a spell that increases a target’s movement speed
Taunt - An ability that draws the attention of an NPC
Train - Indicates that one or more “KOS” NPCs are chasing a player to a zone line
TS - Tradeskill
Unique - An item that you can only carry one of at a time, often used in quests
Unique Equip/“Lore” - An item that you can only equip one of at a time
WTB - Want to buy
WTS - Want to sell
WTT - Want to trade
Zone - A specific area in the world, separated by “zone lines”
Zone Lines - Invisible lines that, when crossed, transition your character to another “zone”
Zoning - The act of transitioning across zones via a “zone line”